

Wall infestations are the hardest mouse problem to solve. You can’t see the animal, you can’t reach it, and you can’t always tell when it’s gone. Most guides hand you eight tips of equal weight and let you sort it out, which is why people trap for a month and still hear scratching.
Key Takeaways:
- Why DIY trapping alone has a high failure rate on wall infestations
- The order these three steps must run in, and what happens when you flip them
- Which sealing materials hold up, and which ones mice chew through in under a week
- Why the scent trail left behind matters as much as the mice themselves
- The signal that tells you it’s time to stop working on the problem alone
Why Mice in Walls Are Different from Mice in a Kitchen?
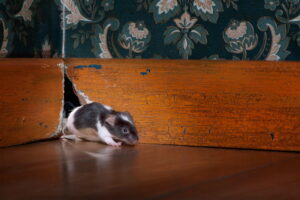
A mouse in your kitchen is a mouse you can see, track, and corner. A mouse in your wall has everything it wants already. Warmth, insulation for nesting, no predators, and a private highway between rooms.
That’s the trap homeowners fall into. They wait. They figure the mice will leave once the kitchen is locked down. The mice don’t leave. House mice can survive weeks on insulation, moisture, and the rare pantry score. Wall cavities are where mice hide for the long haul.
In LA, house mice (Mus musculus) are the wall-dwellers in single-family stucco and wood-frame builds. Roof rats prefer attics, ceiling voids, and palm fronds. Light, fast scratching at floor level usually points to house mice. Heavier movement higher up usually points to roof rats, and the removal plan changes from there.
Step 1: Seal Every Entry Point on the Building Exterior
This step goes first. Any honest answer to how to get rid of mice in walls starts at the exterior because trapping inside an open building is bailing water with the tap on. New mice will refill the wall cavity faster than you can clear the existing population.
A full exterior seal is what 360 calls rodent proofing. Find every gap a mouse can use, and close it with material the mouse can’t defeat.
Materials that hold up:
- ¼-inch galvanized hardware cloth, cut and screwed in place
- Copper mesh is stuffed into irregular gaps, then capped with mortar or sealant
- Sheet-metal patches for larger holes in siding or fascia
- Mortar or concrete for masonry gaps around the foundation
Materials that don’t hold up. Expanding spray foam alone (a mouse chews through it in days). Steel wool stuffed loose with no fastener (pulls out). Caulk over any gap wider than a pencil. Duct tape or anything fabric-backed.
Mice can squeeze through openings the size of a dime, around 6 mm. That’s the threshold to inspect for.
LA-specific entry points worth checking first. Stucco weep screens at the foundation line. Lower corners of garage doors where the weather seal has worn. Foundation vents with missing or rusted screens. AC and refrigerant line penetrations. Roofline gaps where stucco meets the eaves. Our rodent-proofing service in Los Angeles covers the entire envelope.
Step 2: Clear the Mice Already Inside the Walls
With the building sealed, the existing population can’t get reinforcements. Now you trap.
Snap traps remain the most reliable tool for indoor wall work. Place them along the wall-floor junction, perpendicular to the wall, trigger end facing the baseboard. Mice run with one side of their body against a vertical surface, so a trap set parallel to the wall gets stepped over more than it gets sprung.
Bait with peanut butter pressed deep into the trigger cup. Tie a piece of cotton or dental floss through the trigger so the mouse has to commit weight to pull it free.
Plan for 7 to 14 days of active trapping. Reset and rebait every morning. If a trap goes cold for three nights running, move it.
Two tactics to skip.
- Poison bait inside wall voids. Mice eat it, retreat to the nest, and die where you can’t reach them. The smell can last three to six weeks, and a poisoned carcass becomes a secondary poisoning risk to pets and scavenging wildlife. California’s AB 1788 (covering second-generation anticoagulants) and AB 2552 (covering first-generation anticoagulants) restrict consumer use of most rodenticides for exactly that reason.
- The “drill a nickel-sized hole in your drywall and bait a trap through it” trick on home-improvement blogs. It works occasionally, but it damages your finish wall and traps you in a cycle of cutting new holes every time you hear another mouse. Skip it.
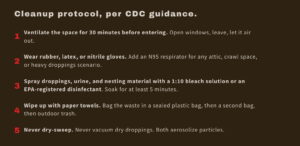
Step 3: Clean Up Droppings, Urine, and Nesting Material
The step that almost every other guide treats as optional. It’s also the reason re-infestations happen after a clean exclusion job, and the part of how to get rid of mice in walls that almost no DIY blog covers properly.
Mice mark their travel routes with urine. Those pheromone trails persist on framing and insulation long after the mice are gone, calling new mice back to the same entry points if any gap was missed. A seal-and-trap job without decontamination is half a job.
Contaminated insulation also loses R-value. Once droppings, urine, and nesting are widespread, spot-cleaning won’t recover the material. Full removal and replacement is the right call. Our attic cleaning and insulation services run alongside rodent proofing on the same job.

Mice infection risk in California is real but manageable with proper PPE and wet cleaning. House mice (Mus musculus), the species in most LA wall infestations, are the primary reservoir for lymphocytic choriomeningitis virus (LCMV), which spreads through aerosolized urine and droppings. Salmonellosis and leptospirosis are the other common concerns. Hantavirus is carried by deer mice (Peromyscus maniculatus), which are uncommon in urban LA homes but show up at cabins, rural properties, and structures near open space. The wet-cleaning protocol above is what reduces airborne particle risk across all of these.
Signs You’re Past DIY
Some wall infestations don’t yield to homeowner work, no matter how careful the job. At that stage, the practical answer to how to get rid of mice in walls is to call someone with the equipment and access to finish it. That call is warranted when scratching continues past 14 days of consistent trapping, when you hear movement in walls you can’t physically access (second story, vaulted ceiling, shared wall), when visible droppings appear in more than two rooms, when insulation is matted or shows obvious runways, when a decomposition smell appears in a wall (a mouse died inside), or when the property shares walls with another unit, garage, or commercial neighbor.
At that point, continued DIY usually costs more in time and damage than a professional inspection.
Done Right, This Sticks
A better trap or stronger bait won’t change the outcome if the building stays open and the scent trails stay on the framing. How to get rid of mice in walls in a way that holds comes down to three moves. Seal the building, clear what’s inside, clean what they left behind, and do them in that order.
If you’re in Los Angeles and want it handled in one visit, reach out for an inspection.
FAQ
1. My neighbor just had their house tented for fumigation. Should I expect mice in your home next?
Yes, this is a real pattern. Tenting drives rodents off the treated property, and they relocate to the nearest unsealed structure. Do an exterior walk of your building within 48 hours of a neighbor’s fumigation. Most post-tenting infestations show up within two weeks.
2. I rent in California. What’s my landlord legally responsible for?
California’s habitability laws (Civil Code 1941.1) require landlords to maintain rentals free of pest infestations not caused by the tenant. Wall infestations almost always qualify. Document the activity, send it to the landlord by email so there’s a record, and request a remediation timeline. If they refuse to act, local code enforcement can inspect. This isn’t legal advice, just the framework.
3. I have a baby on the way. How long after cleanup is the room safe?
After a proper wet cleanup with 1:10 bleach or an EPA-registered disinfectant, surfaces are safe once dry. Ventilate for 24 hours after cleaning to clear residual fumes. If the work involved insulation removal, the bigger concern is dust drift during the job. Keep the work zone sealed off until the job is fully closed out before bringing sensitive occupants back.
4. Will my homeowner’s insurance cover rodent damage?
Almost never for the rodent damage itself. Most policies classify rodents as a maintenance problem, not a covered peril. Resulting damage can sometimes be covered, like a chewed wire causing a fire or compromised plumbing causing water damage. Read your policy’s “vermin” exclusion before you assume.
5. I sealed everything I could find, and I still hear one mouse. What did I miss?
Common missed points, in order of frequency. The attic-to-wall transition where the top plate meets the framing. Dryer vent flapper gaps. Recessed lighting on upper floors. Kitchen plumbing chases. The gap behind the garage door header. If the noise stays in the same cavity, the entry is usually within 8 feet of that spot.
6. How long before I should expect to hear mice again?
In LA, year-round breeding pressure means new mice are always looking. The realistic standard isn’t “never again.” It’s that the same population doesn’t return through the same gaps. A properly sealed building can go years without re-entry. An annual exterior check keeps the seal current.
